Tag Archives: african-american cuisine

Abstract 4th of July Glazed 7up Cake

Abstract glaze for a 4th of July cake

My mother is going to see family in New York City and Germany this summer.  She’ll be gone for two months and is leaving on Tuesday, so I made a couple of special things as a sort of a bon voyage last night.  This is a reason to celebrate for all of us, if you catch my drift.

The meal turned out to be a total bomb.  It was hot in the kitchen, I was rushing and trying to do too much, and my leg was bothering me.  I have osteoarthritis in my right leg, which set in, they think, because of a minor injury I had years and years ago.  Standing for long periods wreaks havoc with that leg, even with a gel mat.  I was one miserable camper even before the oyster soup overcooked and broke.  Then I undercooked the brie in puff pastry, so it was gummy.  Amateur mistakes that were my own fault.  I stewed in my own juices as my family ate the oysters I fished out of the soup with the top layer of the baked brie, telling me all the while how good everything was.  You have to love kind people.

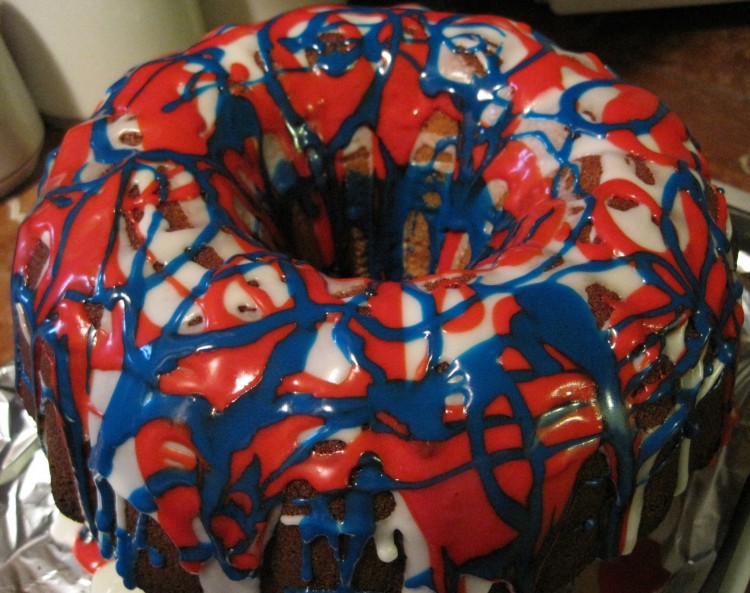
I sought to redeem that meal via the 7up cake I made for Matthew to take to a party today, which I gave an abstract glaze in red, white and blue.

Here’s how you can do it, too.

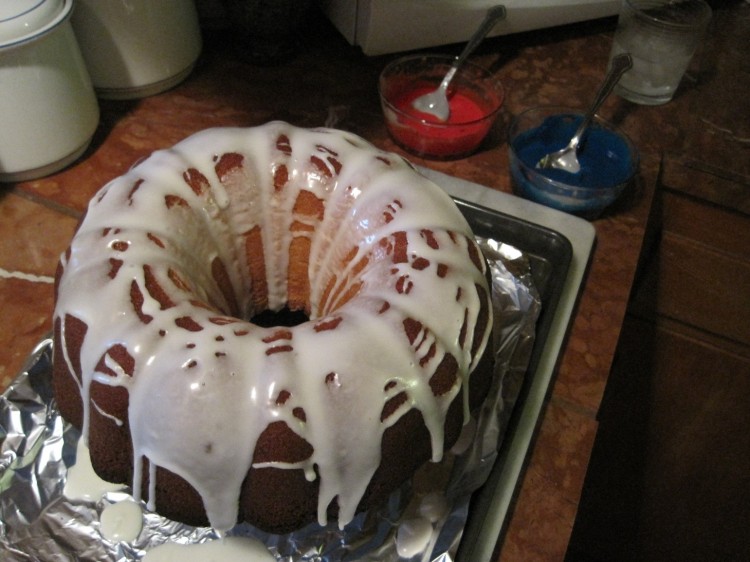
1).  First, make a pound cake in a bundt pan of some kind and let it cool completely.  Make this 7up cake, which is a huge favorite in my home, but ignore the glaze in the recipe.  It’s buttery and dense with a lemony zing, and uses 7up as a leavening agent.  When it’s cool, set out a sheet pan, line it with foil, place a small bowl on top, and then place the cake on the bowl, right side up, so it’s elevated.  Use a bowl whose diameter is smaller than that of the cake.  Check out the photos below.

2).  Assemble blue and red food coloring (you can buy concentrated natural food colorings on the web or in baking or specialty stores), confectioners sugar, lemon juice, one medium-sized bowl and two smaller bowls.  Use bowls that won’t be ruined by the food coloring.  You’ll also need three spoons.

3).  Place three cups of confectioners sugar in the larger of the three bowls.  Add a very small amount of lemon juice — no more than three tablespoons.  Mix in to check consistency.  Add more lemon juice in tiny increments, so you wind up with a very thick glaze that runs slowly.  You will need only a small amount of lemon juice!!!  Transfer 1/3 of the glaze to each of the smaller bowls.

4).  Add a few drops of blue food coloring to one of the smaller bowls of glaze and mix it in thoroughly.  Add more, if needed, until you get the color you want.  Repeat for red.

5).  Using a spoon and holding it above the cake, apply white glaze (the one you added no color to that’s remaining in the larger bowl), allowing it to cover the top well and run down the sides and middle. Check out the photo below for an idea of how things should look.  Allow cake to sit a few minutes.

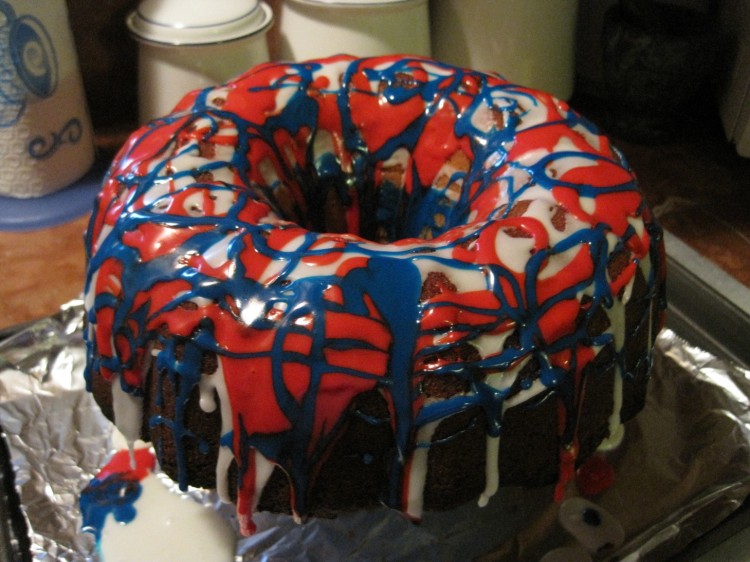
6).  Apply red next, using quite a bit of glaze with each spoonful.  Drizzle on using a looping motion.  You want plenty of red, but allow lots of the white to show.  Make sure the red glaze runs down the sides and middle.  Allow cake to sit a few minutes.

7).  With blue, swirl all over cake in small ribbons.  You want this layer thin with lots of lines so it creates an abstract design.

8).  Let cake sit for a couple of hours.  Do not touch it!  Do not cover it!

9).  Tent foil over cake gently and let it sit all night so that the glaze hardens completely.  Do not touch cake with foil!  Do not move cake!  Leave the whole contraption as-is and cover it with foil!

Fried chicken livers – too good to believe

Fried chicken livers

Fried chicken livers

I bought some chicken livers to make chopped liver for my husband – which I do annually, but I thought I’d switch it up and make some fried chicken livers instead.  I had them at a soul food place awhile back, and they were so good I found myself fantasizing about them off and on.

This is one of the easiest things to make.  The only way you can screw them up is by overcooking, so don’t do that.

Fried Chicken Livers
     Serves several people as a snack

1 pound chicken livers, trimmed of connective tissue
1 cup milk
1 cup flour
1 tablespoon salt
Enough Canola oil to deep-fry in whatever heavy and deep pan you are using
Freshly ground pepper

1).  Place milk and trimmed livers in bowl and refrigerate for an hour or two and then allow to sit on counter for 30 minutes before frying.
2).  Start heating your oil.
3).  Whisk together flour and salt in a mixing bowl.
4).  Remove livers from milk with your hands and add to flour/salt mixture and shake around until livers are coated.
5).  When oil is hot (350 deg. F. is good, or when some white bread sizzles), shake excess flour off livers and add to hot oil carefully; do not crowd pan.
6).  Move livers around a bit so they don’t stick together.
7).  Fry until golden brown – should not take more than a couple minutes.
8).  Remove to paper towels to drain excess oil.
9).  Add a couple quick grinds of fresh pepper and enjoy while hot

Home of Chicken and Waffles in Oakland

Matthew’s plate at The Home of Chicken and Waffles in Oakland

Matt and I thought we should have something decadent in honor of school starting this week.  Having gone through all the acting classes offered at Berkeley City College, he registered for one at Laney College, which put us near downtown Oakland as we eyeballed the location of the campus vis a vis the Lake Merritt BART station.

After getting our business taken care of, we decided to go to Home of Chicken and Waffles (444 Embarcadero West, Oakland), which is right across from Barnes & Noble near the main entrance to Jack London Square.  It’d certainly be hard to get more decadent than fried chicken, waffles and macaroni and cheese, plus we wanted to give this place one more shot after having had a mediocre meal with poor service a few years back.

When we walked in, we were greeted immediately and made comfortable while a table was prepared for us.  I noticed that the restaurant, which has a kind of retro-diner theme, added a bar with a nightclubby feel in a space to the right of the main dining area.  Nice.

Once seated in a comfy booth by the windows, we were introduced to our server, who handed us a menu with a huge selection of combo plates, whose names and representations were part of a colorful mural behind the counter.  Home of Chicken and Waffles bills itself as a Southern-style restaurant, and accordingly offers quite a variety of eats, including salads, a full range of breakfast foods, and a number of Southern sides, like greens and mac and cheese.

The problem I had (and I recall having it the last time) was finding a combo that had enough chicken and not too much else.  While you can order extra chicken a la carte, it is not really cost effective, given that combo prices are not really low to begin with.

I settled on a combo called “Kim’s Creation,” that came with a breast, wing, grits, two eggs and a biscuit for just under $11.  Matthew chose the “Princess Jordan,” for just under $12:  one breast, mac and cheese, greens and corn bread.  We also threw caution to the wind and got the fried chicken livers appetizer for $6.75.  What the heck, in for a penny.

My plate at The Home of Chicken and Waffles in Oakland

The entrees came first, the livers therafter, so we wound up eating everything together, which worked out fine, though they should be more careful about this.  It’s not like the place was jammed at that time of day, so an error like this always makes me wonder about busy times.  That said, the server was attentive and friendly, so that makes other things better for me.

There is no doubt that things are made to order here.  While the massive chicken breasts were a bit dry, they were not greasy and had good flavor.  My wing, however, was excellent, and I will make a point of ordering them exclusivly the next time.  The two eggs on my plate were cooked perfectly (over easy), so I had plenty of yolk action with the grits.

The mac and cheese was proclaimed “very good” by his nibs, and he should know, because it is the defining part of a Southern meal for him.  I prefer greens, which were standard here, and I did get some sandy grit in the forkfuls I nabbed off Matt’s plate.

While the cornbread was good, the biscuit was seriously top-notch – tender and tasty, with just enough density to satisfy.  I was sorry I traded it for greens, to be honest with you.

The highlight of the meal for me was the fried chicken livers.  A goodly amount arrived straight out of the fryer, and, joy of joys!, they were not overcooked, rather creamy inside and crispy outside, with just enough batter and seasoning to enhance and not overpower them.  If you eat this kind of thing once every five years, you want it done right.  I would have been crestfallen if they arrived like tennis balls.

One beverage issue I should mention here is that the sweet tea ($2.50 a pop) does not come with refills, like the regular iced tea and soda.  I don’t understand this.  Isn’t sweet tea just iced tea with lots of sugar?

Matthew at the home of chicken and waffles in oakland

I will certainly come back because our overall experience was much better this time around, though I’ll apply all we learned to my next order.

Ebony cookbook

De Knight, Freda. The Ebony Cookbook. Chicago: Johnson Publishing Company, 1973.

This is one of my favorite retro cookbooks.  The 1973 version is not easy to find, and I was lucky to have paid only 5 bucks for it at Half-Price Books in Berkeley, one of my favorite places to buy old cookbooks – second only to library book sales.

There are some great biscuit and quickbread recipes here, as well as all the comfort food standards, like chicken and dumplings.  This is my go-to book when I want to make an easy, delicious, frosted cake on a whim, since there are numerous recipes that won’t have you turning your kitchen upside down.

If you love African-American cooking (and who doesn’t?), this is a must because the recipes are the real deal.

Corn muffins

corn muffins on two plates side by side

Corn muffins made today.  That box of Albers yellow cornmeal was staring me in the face so I put together the recipe on the box, adding twice the quantity of sugar called for.  I made two batches — one for the heavy, dark, non-stick muffin pan and the other for the blue silicone pan.  The heavy pan browned better, but both versions were fine.  These silicone pans (even the smooth ones) stick when you make cornbread or pound cake-type recipes, I don’t care what anyone says.  I always rub a little oil in them first.  The last time I made cupcakes in those individual, ridged silicone cupcake pans, fuggedaboutit — they really stuck and were a mess to clean up.  Berry took it upon himself to oversee the corn muffin process and then kept an eye on them, as you can see in the photo.

Find the dog watching corn muffins being made

Find the dog watching corn muffins being made